Beginners series: Using the new UI layers in GameMaker 2024.13

Finally, the long awaited update to GameMaker's UI system has arrived, and it's, dare I say, good, ish, perhaps a little undercooked.
GameMaker was the first real game engine I used (unless you count the interesting time I had trying to make a custom version of Pokemon Yellow in GBStudio), and since then I've tried many others, including Unity, Defold, Godot, Love2D, but for whatever reason I found myself always coming back to GameMaker. Whether it be nostalgia, GML, or the colours of the interface, something brought me back. There was only ever one lingering frustration -- GameMaker's lack of WYSIWYG UI tools.
Prior to the recent update, if you wanted to draw a UI, you had to write the code to draw it manually. This usually involved a bunch of for loops, and magic numbers for pixel offsets, and a whole load of guessing those numbers, running the build to see the results, then returning to the numbers to guess again. Well, no more guessing. UI layers are here, and GameMaker finally has a tool that allows you to see your UI as your building it, with responsive alignment, resizing, updating text (with the help of some fairly simple code) and some, err, annoying bugs.
But, at least in my experience, it's a lot less of a pain than it used to be.
So how am I using the new UI layers. Well, for everything UI. Our current (as of yet, unannounced) work in progress is a narrative focused RPG with a lot of text, and I was delighted to be able to present this text using a UI layer. There are probably other (and maybe better) ways to use these new UI layers, but here's how I did it.
Weird Flex Panel
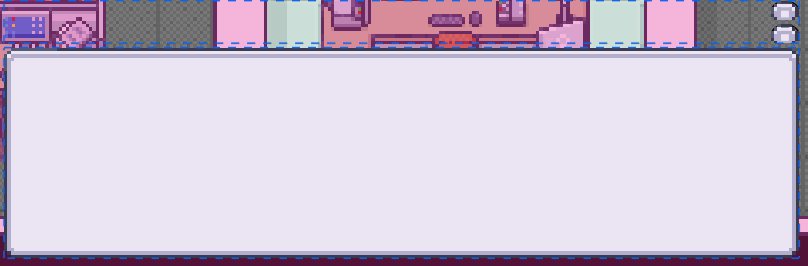
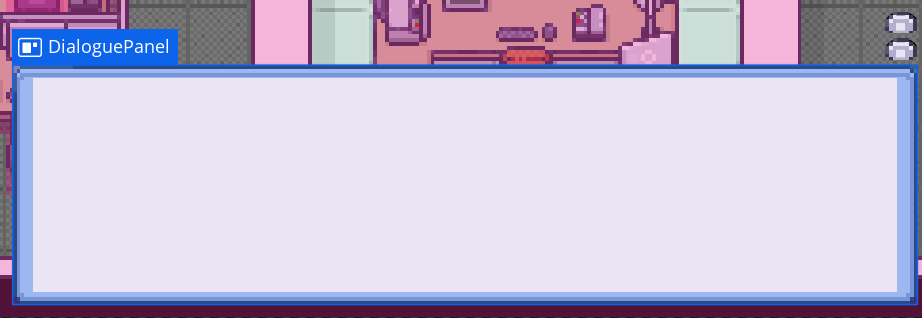
The above is the current version of our dialogue box. This is what it looks like in the room editor when placed onto a UI layer. Creating the dialogue box was as simple as dragging a sprite onto the UI layer in the inspector and setting its Stretch mode to "both". That's it. No more draw_sprite_stretched(). Drag a few more elements onto the layer and you got yourself a UI baby. The two smaller boxes are for dialogue responses the player can choose from, which resize dynamically depending on the length of the string displayed within them. Since I want them to be clickable (and hence, run code) they need to have an object attached to them.
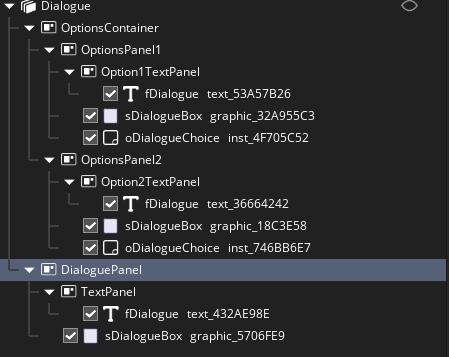
Now, admittedly, flex panels are kind of meh, and weird to work with (I still don't explicitly know the correct hierarchy for panels and objects, fonts items, sprites etc) but with a bit of tinkering they start to make sense. I drag things around until they look right, basically. My basic rule of thumb is: if I want something to be a separate part of a row or column it goes inside it's own flex panel. If I want something to appear overtop of another thing (ie text over a sprite) those two things go inside the same panel.
With that sorted, it's just a matter of checking the correct setting in the inspector (again, I click things until it looks right).
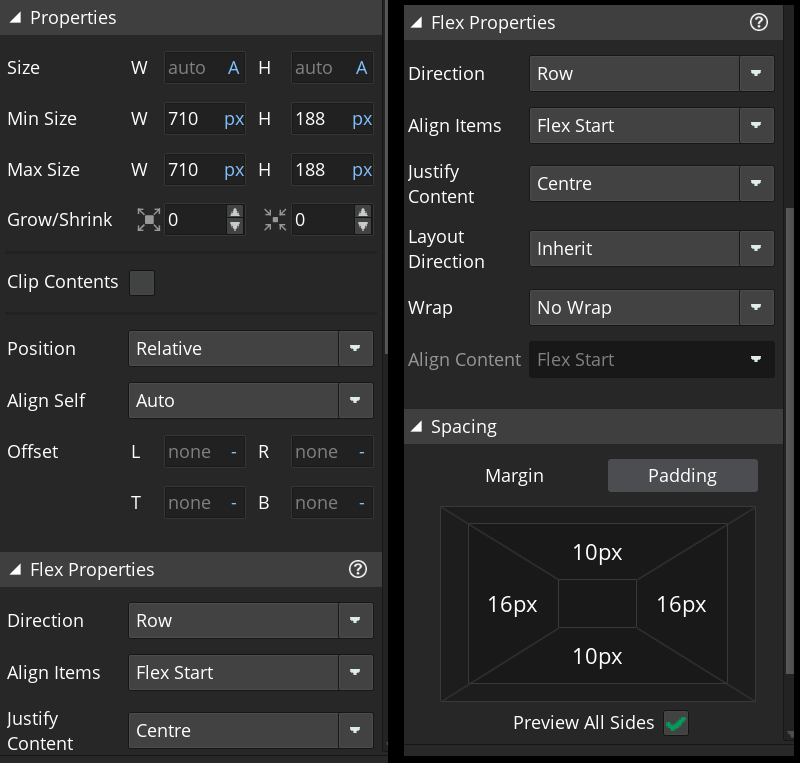
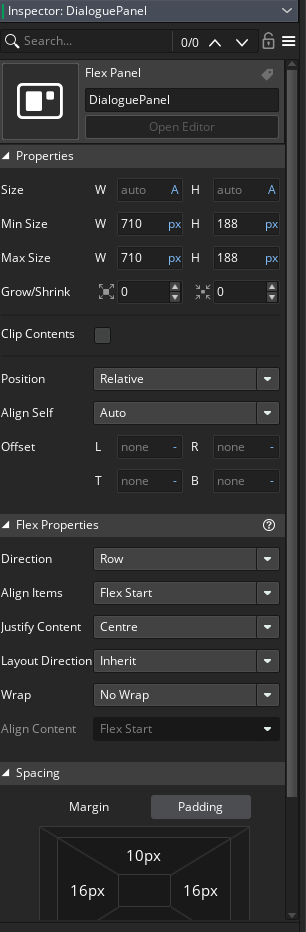
I control the dimensions of the textbox by setting the minimum and maximum size to the same values. I use a script that inserts a page break into my dialogue strings if the word exceeds a certain pixel length, so I need the box to be a static value. (And yes, I realise setting these same values into the size parameter probably achieves the same thing, but, hey, computers and I have some trust issues).
Hopefully the other settings are fairly self explanatory. The flex properties section simply positions the dialogue box relative to the camera. Direction being row means we are positioning the flex panel horizontally (across the x axis) and the content is justified to the centre of that x axis.
The padding makes sure that any subpanels (the text panel seen in the hierarchy above) don't run right up to the edge of the sprite.
The key here is thinking of each flex panel as a container, within a container, within a container... The UI layer itself is the original container. It fills the height and width of the room/camera. I want my dialogue to be at the bottom of the screen, so the layer itself is set to column direction (top to bottom, y axis etch) with the Align Items setting to Flex End. A little bit of padding at the bottom ensures the dialogue box isn't right at the bottom of the camera.
Some Assembly Required
Yes, that's a (bad) pun, that doesn't really make sense.
Now you might have noticed something odd in the flex panel hierarchy above. Why do you have a sprite (sDialogueBox) and a sprite-less object (oDialogueChoice) when you could just combine the two into one, I hear you ask. Bugs, good doctor, because of bugs.
As of the time of writing, with the current stable release being 2024.13 there is an (only one? I wish) annoying bug with UI layers, specifically, if you change rooms at runtime, text items get placed underneath objects in the draw order. This results in your shiny new dialogue box showing as blank. The text is still there, it's just being drawn under your objects on that layer/flex panel. Apparently this has been reported many times (honestly, kind of a bungle to not catch that before release) and is already fixed in the latest beta releases, but for now, I recommend separating object from sprite, if you're planning to put it/them in a UI layer.
Well, that's all perfectly usable, but how do we update these text items with the text we want. Isn't that kind of important for a UI? Indeed. And the answer is quite easy.
I have an oDialogue object that handles all of this for my main dialogue text box. In the create event we want to store a couple of references to the corresponding layer (for me: "Dialogue") and for the text item itself. In example code this might look like:
--Create-Event-obj_Dialogue--

dialogueLayer = layer_get_flexpanel_node("Dialogue");
dialogueText = layer_text_get_id("Dialogue", "text_88888888");
You may want to set your dialogue layer (or whatever layer you're working with) as a global variable. I set mine in a script that is purely for setting globals as the game inits.
Next, all we have to do is call layer_text_text() and give it the id of the text item (which we just stored above) and a string to print. It helps to actually bring up the UI layer as well. Turn's out, there's a handy function for that too: layer_set_visible()
--Step-Event-obj_Player--

// Loading text based on collision
if (place_meeting(x, y, oNPC)
{
    layer_text_text(dialogueText, "Hi, I'm an NPC.");

    // Making the dialogue layer visible
    if (keyboard_check_pressed(vk_enter))
    {
        layer_set_visible(dialogueLayer, true);
    }
}
Now, I don't recommend actually drawing your dialogue this way. How you retrieve your dialogue strings and how you set them is up to you (you'll want a way to hide the dialogue box again, of course). But this should give you the basics of how to incorporate the UI layers into your workflow. If you're making something like a scoreboard that updates dynamically, this is actually more than you need.
In my free game _fulfilment, I used the UI layers to do exactly that. I simply had a score variable keeping track of an integer and used layer_text_text() to display it.
--Step-Event--

layer_text_text(scoreText, score);
That's it. Simple.
In my upcoming (as of yet unannounced, I'll reiterate) RPG, for the actual handling of dialogue strings, I use Chatterbox to get my dialogue strings from .yarn file nodes, based off of collisions between the Player object and different NPCs/items in the game world. If you don't know what the above means, don't worry, that's a topic for another day, but, if you are making something dialogue heavy, especially with branching dialogue, I can't recommend the plugin enough. (At this point, just use everything JujuAdams makes).
Evening Inspector
Overall, I like the new UI layers. Yes, they probably needed more time to cook, yes there are other bugs that I haven't mentioned, yes there are UI plugins that you could use that may or may not give you a better experience, but if you're like me and don't mind coming up with a few workarounds, they're pretty good, and (hopefully) they can only get better.
I find the majority of the learning curve for the UI layers lies in this:
As always, start with the official tutorials. There's also a much longer VOD of a GameMaker stream, but it pretty much covers the same information.
That's it for now. I hope this is helpful to someone. Feel free to reach out to me: holdrightgames@gmail.com. I always enjoy helping others learn. Heck, I even used to do it for a living.